Wednesday, April 27, 2011

Plumbing Inspection


We had our first inspection today and of course we failed.  The plumber was here a few days ago to connect our trench drain to the existing sewer line.  Apparently he used the wrong size pipe.  Not a big problem but we were hoping to back fill the pipe and prepare the floor for the concrete pour that is happening later this week but that will have to wait for the plumber to come back and fix the problem and another inspection. 

On the plus side our electrical inspection passed.  The electrician finished running all the under slab conduit and now we can back fill the trenches and get ready to pour.  

Monday, April 25, 2011

Kegs


When we were meeting with potential brewers one the of the first questions they all had for us was regarding our plans for kegs.  Since we are planning to launch as a draft only brewery and it will be our only package for the foreseeable future it's a reasonable concern.

We were planning to package in either 15.5 gallon or 50 liter (13.2 gallon) kegs and 5.2 gallon kegs. called sixtels.  The decision on the larger package size was going to be based on whatever was available in large quantities on the used market at the time we needed to purchase.  We were also hoping to find the sixtels used but, like most used brewery related equipment, they are in pretty high demand right now.  

Sixtels are a popular package because bars and restaurants can fit a couple different sixtels in the same space as one 15.5 gallon keg which allows them to offer more brand selection to their customers without expanding their cold storage.  We like that package because it sells through faster so the beer sells fresh. 

The issue with kegs are that they are expensive to purchase, they are easy to steal, often get misplaced and sometime difficult to get back from distributors in a reasonable time frame.  The general rule seems to be that a brewery needs about 4 or 5 kegs for each draft account they service.  One keg on tap at the bar, one in the cooler waiting to be tapped, one empty sitting at the distributor's ware house waiting to be returned to the brewery and one or two at the brewery to fill for the next shipment. 

Since we are going to self distribute we should be able to get our kegs back to the brewery faster and, at least, attempt to keep track of them more easily but that means we still need about two or three kegs per account.  

The other part of the equation is the brew house size.  Since we have a 20 barrel brew house it will take around forty 15.5 gallon kegs or 120 sixtels just to package one batch.  In reality there will be loss in fermentation, transfer and packaging so the number of kegs per batch is less, but you get the idea.  Multiply that by three for the number of fermenters we have and the number of kegs required adds up fast.  


We decided that we were going to try and find around 300 kegs to get going.  Since we had no clear idea what the demand was going to be for each package size we decided to play it safe and go 50/50.  We were able to find a large quantity of used 15.5 gallons kegs at good price so we went with them over the 50 liter kegs.  We got six pallets or just over 160 of these kegs delivered to us the other day.


We were not able to find a large lot of used sixtels and the lead time on new kegs were such that we needed to place that order to ensure we had them by launch so we got just over 160 new sixtels.  We could have tried to buy them used 20-30 at a time, but the price on the new ones was close to the going price on the used market so we took the easy route on that one.  They should be here at the end of May.  

Thursday, April 21, 2011

Pilot Brewing Update

Now that the pilot system is set up, we have been really focused on experimenting with different yeast strains. We plan to use two different yeast strains for a majority of our beers—one for our American-style ales and one for the Belgian-influenced beers.

When Clay was Head Brewer at Sleeping Lady, he used a Scottish yeast strain for most of his beers.  The reason he used it was because he had 15 tap handles that he needed to keep stocked with beer and that strain allowed for a fairly neutral fermentation that could produce a wide variety of styles with quick turnaround.  As a home brewer I mostly used one of two different English strains in my ales.

One of the first things we did was take four different yeast strains and break up a basic pale ale recipe into four different carboys and ferment them under the same conditions with each strain.  Even though we had both used all these strains before we decided it was worth the time to do a side-by-side comparison using the same batch of beer.  


We used two English strains, a Scottish strain and an American strain.  Although it was a very limited sampling, after the test we narrowed it down to one of the English strains and the American strain.  We plan to run through some split pilot batches using these two strains before we decide which direction to go.

We did the same thing with a few Belgian strains and after a few tests it was pretty clear that we like the flavor profile and fermentation characteristics of a Trappist strain.  So we plan to use that for the next few pilot batches.         

Wednesday, April 20, 2011

Construction Permits

The good news is that we got our construction permits.  We went down to the town this morning to try and sort out this chillier situation.  We decided that we would try and get approval for placing the chiller out back in our courtyard near our loading dock.  It would be out of the way of traffic, there are no parking spots or driving lanes to deal with and, again, there is an existing unit next to where we would like to put it so there is obviously space.   

The zoning officer said that he thinks it would be acceptable but we would need minor site plan approval.  We would not be required to go before the board or hire an attorney, just submit a plan with our proposed use.  It’s still not cheap, but its better than the alternative.  The downside is that the next meeting is in late May so we won’t know until then. 

Fortunately, the construction official decided that he could issue all our permits with the exception of the one that covers the installation of the chiller.  He was also kind enough to release our permits without the plans from our sprinkler contractor.  So we still have two outstanding items to deal with but at least we can get started turning the warehouse into a brewery. 

Friday, April 15, 2011

The Roof

The engineers who put together our plans came down to inspect the roof to see if it could support the chiller.   We were able to get a set of plans of the roof construction from the owner, which help out a lot, but it took them some time to find the specifications on the materials that were used because of the age of the building.  

After some number crunching, it turns out that the engineers did not think it would be a good idea to put that much additional weight on this roof.  Granted the chiller weights about 2,000 pounds, but we were surprised with that conclusion.  Industrial buildings are generally designed and constructed to support roof top units of this nature.

It didn’t matter what we think, if the engineer won’t sign off then the town won’t approve the permit for the location so that’s the end of that.  On to plan C. We are down to either just putting it inside the brewery itself or finding a space outside that will not require a variance.  The downside to having it inside is that it generates a fair amount of heat and noise but if that’s the only solution that’s where we’ll have to put it.  We’ll have to talk to the town and see what we can work out. 

Thursday, April 14, 2011

Chiller Solution

We spoke to our landlord and decided to move the chiller to the roof.  It was a better location in the first place but my landlord didn’t really want me to put any equipment up there so I opted for outside the building.   Now that the outside is an issue we are back to the roof. 

We told the zoning official about the move to the roof.  He was fine with that and since there was no longer any zoning issues he signed off on our plans—as long as the chiller is not visible from the street. 

Now we can get our permits, right?  Not quite. In this situation a solution only creates another problem.  Now the construction department needs an analysis signed by a licensed engineer that the roof will support the extra weight.  Also I am told that our permits can not be released until the fire marshal has approved the changes he asked for and I am still waiting for our sprinkler contractor to submit his plans.   

Tuesday, April 12, 2011

Next Problem

Now that the floor has been removed we can’t really move ahead on anything else until the rest of our permits are issued.  It has been a few weeks since we got them the names of our contractors so I figured it was a good time to stop over and see where we stood.  We were told that the zoning officer had yet to sign off on the plans and he was leaving in a few days for vacation so we should speak to him if we wanted anything in the next two weeks.

We figured that getting his sign off wouldn’t be a problem.  Back before we signed the lease we spoke extensively with zoning to make sure there wasn’t going to be an issue or a repeat of Manasquan.  After the warm reception in Manasquan one of our top priorities when looking for a new place was that it did not require a zoning variance.  

After a few conversations, we determined that the building was zoned properly and we could move forward with our plan.  The zoning officer told us that they would be required to sign off on any plans for construction but that shouldn’t be a problem now that we cleared from a zoning perspective. 

So we got a hold of the zoning officer, expecting a quick sign-off ,when the first thing they told me after looking at the plans was that I could not put our glycol chiller outside the building where we had planned.  We were told that it appeared as thought a variance would be needed to put the chiller in the parking lot on the side of the building.  

The only way they would know if I needed a variance was if I submitted a site plan of the property including the proposed location of the chiller.  In order to submit a site plan I needed an updated survey of the property—which we didn’t have.  That meant hiring a surveyor and getting an engineer or architect to turn that survey into a site plan.  And that wasn’t the worst part.  We then needed to go before the board the get the variance approved—which would require hiring an attorney and planner to represent us.  Having lived through that process before, I realized that it could take months and cost thousands of dollars.

They claimed the issue was that the chiller would take up space along the side of the parking lot and may obstruct the flow of traffic.  My understanding is that according to code we need 12 feet on both side of the driveway in addition to any space the chiller may take up.  Without an accurate survey and plan they couldn’t tell if there was sufficient room for the unit.  

The best part of this discussion was that there is an existing air conditioning unit next to the proposed chiller location that takes up as much space in the driveway as our new unit would.  The air conditioner has been there since the building was completed in the 1980s without issue.  We were told who ever did that did it without proper permission so it was irrelevant to this matter.  

So now were back to the drawing board on the chiller and we need a solution before the zoning officer goes on vacation or we have to wait another two weeks for permits. 

Monday, April 11, 2011

Hop Farming


Last week we noticed that this year’s hops had started to come up so we decided we better get them to the brewery where we plan to grow them this year before they get too tall.  I know my wife was excited to get them out of our yard and I’m sure my neighbors will not miss the 10 foot (shorted from and original 14) trellis that goes up each spring.


This year we plan to put them out back in the courtyards between the two buildings on our site.  That location gets a good amount of light in the afternoon and we can run some rope up the exterior wall for support.  We still have two planters each of the four varieties we had last year, Cascade, Chinook, Columbus and Nugget. 
 
If things go well enough this year, we will try to find a place to put these in the ground and add some more of these and some new varieties.  We won’t have enough this year for more than a pilot batch, but maybe we can combine these with other fresh hops to make a full production batch.  Keep you posted. 

Sunday, April 10, 2011

Floor Demolition: The Aftermath

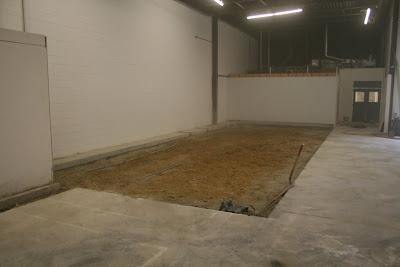
Yesterday we had the concrete floor in our brewing area removed.  It took the 6 guys about 9 hours to break up six inches of concrete with wire mesh reinforcement.  During the demolition we realized that once they broke through the concrete they exposed electrical conduit that was laying on top of the sand under the floor.  We told the guys to watch out for the conduit because the electrical wires housed inside were still in use and we didn’t want to have to fix them if they got cut.  

When the demolition team left that night, it seemed like everything was fine.  Some of the plastic conduit had been crushed or broken but there didn’t seem to be any issues with any of the electricity in the building.  Luckily for us we just happen to have an electrician coming in the next day to do some work.  Once he saw the broken conduit he became concerned and took a look in our service panel to inspect for damage.  Of course he found some major problems.  


Between the Bobcats and jackhammers and not re-burying the conduit before continuing to work the demo guys cut through about five or six wires in each of three conduits running under our floor.  We didn’t realize it that night because the cut wires were powering equipment that was not currently in use, like exterior light, air conditioning units, etc.  


It took three days of unearthing existing conduit, digging new trenches and re-running wires and conduit to fix the problem.  The cost of the mistake ended up being just about as much as the floor demolition.  On top of that it also pushed back the work the electrician was here to do by another three days.  The one thing we’ve learned as construction has begun is that you need to watch everything that is being done all the time.


It seems that most contractors with large teams come in and set things up then take off to the next job.  In this case no one from the construction company was supervising the work and although we pointed the electrical issue to the workers they didn’t really care.  We’ll have to work something out with the construction company on the repair bill but it was another lesson learned.

On a bright side, as you may have noticed from the pictures we did get our trench drain set in place this morning before we discovered any of the electrical issues.


Friday, April 8, 2011

Floor Demolition


If you’ve never spent close to nine hours inside a warehouse listening to a jackhammer, concrete saw, and a hydraulic concrete breaker mounted to a Bobcat ripping apart a 900 square foot, six inch thick slab of concrete you just haven’t lived.  If you ever find yourself in this situation we recommend a heavy duty set of ear plugs, but it was exciting to see some progress finally being made.    


The team got here around eight in the morning and began by saw-cutting the perimeter of the floor that they were going to pull out.  They then went to work with a fairly small jackhammer to start breaking the floor apart.  About an hour into it they had only covered less than 50 square feet and we began to wonder if they were going to finish today.  


We guess they realized the same thing because one of the guys slipped out and came back with another Bobcat with a concrete breaker mounted to the front.  After that things really picked up.  They broke up the floor with the large breaker and used the other Bobcat to pick up the debris.  Around 5:00 PM they were finished. 


I felt bad for our neighbors who had to work through the terrible noise, but it seemed like most of the building had cleared out by 2:00 or 3:00 PM as a result.  At least it was only one day and now its finished.  They plan on coming back tomorrow morning to concrete the trench drain in place.   


Thursday, April 7, 2011

Demolition Permits

The town’s construction department issued us our demolition permit today!  Finally we can start construction.  As excited as we are, while we were standing there getting the permit and talking to them about the process we realized that we plan to run some electrical conduit under the new concrete slab and that the trench drain needs to be connected to the city sewer line before the new floor can be poured.

The demolition permit only covers the removal of the concrete floor.  The permit(s) that cover the plumbing, electrical and pouring of the new floor are attached to the other application that has not yet been approved.  We split the demolition permit since that would move through the system faster alone, but now we realized that once the floor is ripped up, we can't really do anything else until all the other permits are issued.  It’s going to be nice to get the floor removed, but we are going to be at another stand still until the rest of the other permits are issued. 

So what’s holding up the other permits?  We still need to get them the names of the contractors doing the steam, glycol, plumbing and electrical.  We’re working on getting those contractors lined up.  We’ve had a quite a few contractors stop by the brewery to look at the scope of the work, but we are still waiting to get the estimates back.  Once we have those names to the town, it’s up to them how long it takes to process the paper work.

We also forgot to mention that I heard from the fire marshal.  We need to add some sprinkler heads to the walk in cooler and move some other existing heads to new locations.  Not as bad as I had thought it would be, but that could change during inspection.         

Tuesday, April 5, 2011

Concrete Floor

Since we submitted our plans to the town, we’ve been busy speaking with contractors and getting bids for the work.  Our priority is finding a mason to handle the concrete work since we will be getting those permits first and we need to take care of that before any of the other work can commence.  After speaking with a few masons it seems like we are going to be able to afford to demo the floor in our brewing area and pour a new floor sloped to the trench drain. 

The cost difference between just pulling up a section of the floor for our new drain and the entire floor was not as great as we had expected since most of the expense was in getting the equipment set-up and the workers on site.  Once that had been taken care of it was just a matter of a few more hours of work and some extra concrete. 

We’re pretty excited about the new floor because we were really concerned about standing water on the brewery floor, especially in the hot and humid summer, and any potential issues with sanitation.  We are hoping that the sloped floor will help keep the water from flowing all over the brewery and help keep the place more sanitary.   

The other advantage to pulling up the floor is that we will know exactly the strength of the new floor once it’s in place.  We took some core samples of our current floor to a few months ago to see if it would be strong enough to support out equipment if we decided to not rip it up.  From the two samples we drilled it seems like we have a six inch slab with some wire mesh added for strength.  Unfortunately, it looks like who ever poured the floors let the wire mesh settle to the bottom of the pour instead of suspending it in the slab so that reduces the strength of the floor. 

Even still, the engineers have told us that the floor in its current state will have no problem supporting our equipment, but since are going to go through the trouble of pouring a new floor, we plan to use a heavier gauge wire mesh and make sure that he floor is poured correctly and is at least 6 inches throughout.  This way if we ever need to put more weight on the floor it won’t be an issue.

In addition to the mason we have been talking to floor covering specialist about what to do with our new concrete floor.  Almost every mason and flooring expert we have spoken to says that an epoxy floor treatment is the way to go.  They claim that a serious epoxy treatment will stand up to the thermal shock and chemicals expose our environment produces.  Every brewer and brewery owner we have spoken to says that an epoxy floor coating will last about six months and be more trouble in the long run once it, inevitably, starts to chip and flake apart.  From what we’ve seen visiting breweries that have used epoxy flooring we tend to agree. 

Outside of using acid tile flooring, most brewers seem to say that a polyurethane flooring system hold ups the best in a brewing environment.  Typically these products are ¼ inch thick cementitious polyurethane systems (whatever that means), with high levels of temperature, chemical and slip resistance.  They are typically used in food and beverage, pharmaceutical and other manufacturing and process environments.  They are pretty expensive but if you can afford it, plan to be in the same place for awhile and believe they will perform as sold, then they seem to be worth the up front cost—especially if you are going through the trouble putting in  new flooring.

We spoke to representative and technical people from a few companies and the products all seem to be pretty similar.  I’m sure there are more companies out there, but the commercial names of the products or companies we looked into were Ucrete, FlowCrete, Sika, Stonhard, Dura-Flex, in case anyone is interested.  The other interesting about these products is that you can actually use this stuff to build up a slope on a flat floor.  So if our floor was strong enough to support our equipment and we didn’t want to pour a new one to get a slope, we could use these products to create a slope.  The technical guys claim that the floor will not crack until the weight of the tanks, like concrete poured on top of an existing concrete floor, but the cost was petty close to that of pouring new floor so we didn’t really see the advantage.  No decisions have been made yet but it seems likely that we will be using one of these products on our new floor.      

The last piece of the flooring puzzle was the trench drain.  We had the same concerns with the durability in a brewing environment that we had with the flooring.  Again, I’m sure there are many more companies and products that sell suitable drains, but we were deciding between using an ACO and an ABT drain.  Both had the same level of chemical and temperature resistance and one of the sales representative told us that they are basically the same drain, but he ACO one has a stainless steel rail on the top.  Since the lead time on the ABT drain was less and we needed it we went with that, but I’m sure either would have been fine.  We got about their PolyChampion trench drain system and FiberGlass grates.  Both the drain and the grates are made with a vinlyester resin that makes them more resistant to heat and chemicals then their other drain system.            

Now that we seem to have a pretty good idea what were are doing with the flooring in our brewing area we are just wanting for the demo permit to be issued so we can get started. 

Sunday, April 3, 2011

Pilot Brewing


One of the first things Clay did when he got started here was to pull together a pilot system.  Between the amount of home brewing equipment the two of us have amassed over the years, cobbling together a ten gallon pilot systems wasn’t too difficult.  Clay had a wooden frame he built years ago and we used old half barrel kegs for the hot liquor tank, mash tun and kettle.  We added a pump so it’s a fairly automated system—at least more automated then the way I used to home brew.  

At some point we plan to upgrade the frame to something less flammable, but for now we can use it to experiment with different recipes until the big system is up and running.  


We are trying to accurately recreate what we will be doing on the larger system with this because we plan to continue to use it once we’re open to develop new styles and recipes before they make it to the big system.  We also plan to keep the tasting room filled with experimental beers brewed on this system that may not make to the 20 barrel system.       

Friday, April 1, 2011

Chiller Delivery


Our chiller unit arrived today.  We got a 10 hp glycol chiller from ProRefrigeration in Auburn Washington.  Even though we had the specifications on the unit and knew the size, it’s much bigger than we realized.  The units about seven feet tall, six feet long and four feet wide—and weights about 2,000 empty. 

The delivery is good news considering we ordered the unit about nine or ten weeks ago and it’s a critical piece of equipment that keeps our beer cool while its fermenting and carbonating.  The problem is that we were unable to unload the unit because of the way it was shipped.   


As you can see from the picture the only way we could get it off was by picking it up for the side but that would require having a forklift outside or being able to drive our forklift out of warehouse but we don’t have a ramp.  The other option was to drive our forklift onto the trailer, but the gap between our dock and the flatbed was too great to get a 10,000 forklift over. 

What we learned when our brewing equipment was delivered that we could use a pallet jack to pull the delivery or equipment to the end of the flatbed then use the forklift to lift the item into our warehouse from the loading dock.  The problem here was the unit was shipped on a step over the tractor’s back tire.  No one at the shipping company told us it was coming on a step and we didn't think to ask because it never happen before.  

The only real option was to rent a forklift that could pull it off from the outside then move it into our warehouse.  It would be a tremendous waste of time and money to pay for a forklift to be delivered for ten minutes of work, but we really had no choice.  Of course it was 4:00 pm on Friday so after a few phone calls we realized that wasn’t going to happen. 

Luckily a forklift place around the corner, ProLift offered to let us use one of its lifts to move the unit from the step down to the lower part of the flatbed so we could get it off ourselves.  So the we drove the tractor over to their shop and they moved it for us then re-strapped it to the flatbed and we drove it back to the brewery.  From there we pulled it off with our lift.    

Not the best use of three hours on a Friday afternoon, but at least we have our chiller and of course, thanks to the guys at ProLift for helping us out.