Showing posts with label Construction. Show all posts

Tuesday, July 5, 2011

Construction Completed

We spent the last month working with contractors and our DME representative to get the brew house installed and connected to the required utilities.  The DME representative, Paul, showed up right before Memorial Day and was here for 10 days.  The plan was to have all the DME equipment set up and utilities connected to the equipment so that we could perform a test brew with water and check the glycol system before he left.

The way it usually works with these type of installs is that Paul plans to come to the brewery when the steam, electrical, and water is a few days from being finished so that he can answer any questions the contractors have about getting the systems hooked up to the brewing equipment then he will have a few days to test and troubleshot any issues before he leaves. We coordinated the timing of his trip with our contractors to make sure we would be able to get all this done in ten days.


The most complicated part of the install was getting the steam system for the kettle and hot liquor tanks up and running.   The steam guys started a few weeks before Paul got here so that they would be ready for the test brew.


The first few days that Paul was here we spent getting the tanks in their final positions and getting them level and running the pipe water, steam, and electrical to them.  Once that was done we could connect the stainless piping that connects the mash tun, kettle and pumps on the brew house.


Once that was done we spent some time getting the plates into the mash / lauter tun and getting the rake motor mounted on top. 


Next we worked on getting the grain handling systems set up.  We have an existing room in the warehouse that we were planning to use as a mill room to keep all the grain dust separate from the brew house and cellar.  We realized that we were going to have to raise the ceiling to get all of our equipment in there easily.

We moved our mill, grist case and augurs into the expanded room and got those running.  The way our systems works is that the grain is sent through the wall of the mill room, behind our fermenters along the side wall and over to the mash tun.  


We also finally got the town to sign off on the placement of the chiller behind our building.  So we got the concrete pad poured and got the chiller in place so that when they got around to hooking it up it would be ready to go.


About half way through Paul's time here we realized there was no way the company putting together the boiler and glycol system were going to finish as promised.  They were way behind on the boiler install so we decided that it was better for them to focus solely on the steam and not work on the glycol system at all. 

One of the major mistakes we made was hiring one steam fitting / plumbing company to do both.  They were hired to install the boiler, the domestic water service, and pipe and start-up the glycol chiller.  All things we were told they did numerous times.  At the outset of the project they told us two weeks for everything.  Almost immediately they were behind and never managed to get caught up.  

If we had use two different companies like we had originally planned, we could have had both set-ups going at the same time.  Four weeks in they hadn't finished the boiler or glycol.
 
With a lot of pushing they manged to get the boiler fired up around 7:00 pm the night before Paul was scheduled to leave.  Since the boiler was finally working we were able to fill the tanks with water to clean out the residual oils and dust and check the pumps and piping between the brew house.


After that we filled the hot liquor tank and kettle and made sure the steam was heating both.  We did an hour boil to check the evaporation rates and see how the boiler performed over time.  Since we didn’t have the vent installed yet because of on going delays, we were a little concerned about the steam in the warehouse—mostly making sure we didn’t set off any sprinklers from the heat.   


We opened all the doors and set up a few fans and that seem to take care of any potential issues.  By the time we cooled down the tanks and drained the water we finished up around 3 am.  


The other thing we found out was that our drain worked like a champ, moving water from three tanks out of the brewery with no problem.  Although, there were some minor issues that needed to be fixed, overall the steam system worked fine.

When Paul left we had a working brew house, but we still needed to get the chiller fired up.  It took another week or two for them to get the piping finished.  Once it was ready we spent the better part of a day trying to get the chiller started-up, but once it was up and running it seemed to be working just fine.  There were no leaks in the pipes and the glycol was cooling down by design.  Since we thought that system was working fine they brought in their insulation guy to finish the job.  


While they were insulating the pipes we needed to get some sprinklers moved and a few heads added by request of the fire marshal. When that was done we could get our final fire inspection.  We also managed to pass our final electrical, plumbing and construction inspections.  With that we were able to apply for our Certificate of Occupancy, which we received early last week.  Now that all the construction was completed and we satisfied all the requirements from the town, the only step left was getting our brewing license from the NJ ABC.

Saturday, May 14, 2011

Floor Covering


The urethane floor covering we decided to put in our brewing area was installed over the past three days.  It looks great and now we can finally get the equipment moved into place.  After watching their team install the product you can understand why it’s so incredible durable.  


Since the product is ¼ inch thick, the first thing they did was remove the top layer of the freshly poured concrete.  You might be wondering why we didn’t just pour the concrete a ¼ inch lower so we could skip this step in the first place.  We asked the same thing and were told that inevitably the concrete guys never get it right.  They said it works out better most times if you just pour the floor as designed then go back and remove the top layer.  They also needed to chisel out around the boarders and near the drain so the edges were not brittle.  So that was day one.  


The second day four guys mixed, dyed and hand troweled ¼ inch of this product over about 1,000 square feet of flooring.  The trick to this is following the gradual slope established by the concrete guys.  They also used the product to create a slope around the walls where we were unable to cut out the old concrete because we didn’t want to get to close to the roof support with the concrete saw and jack hammers.

Day three involved cutting in joints and filling in the seams and edges with some type of flexible sealant.  We were told to let it cure for about 24 hours before getting it wet and they recommended waiting about two days before putting heavy equipment like our tanks on it.  


The next day we hosed down the floor to see how well the water flowed to the drain and how slip resistant the floor was when it was wet.  They did a great job mirroring the slope of the concrete so the water didn’t pool and the surface was slip resistant but not so rough that we couldn’t get it clean.


Tomorrow we plan to get the shipping cradles off the tanks and move them into position on the new floor.    
       

Tuesday, May 3, 2011

Concrete Floor

We were able to arrange for the inspector to come by around 11:00 am to sign-off on the installation of the wire mesh and rebar dowels that were used to strengthen the concrete.   This helped move the project along because if we could not coordinate with inspector on getting him here the same day as the installation the concrete team would have to come back after it was passed and that would add at least a few days and additional costs. 


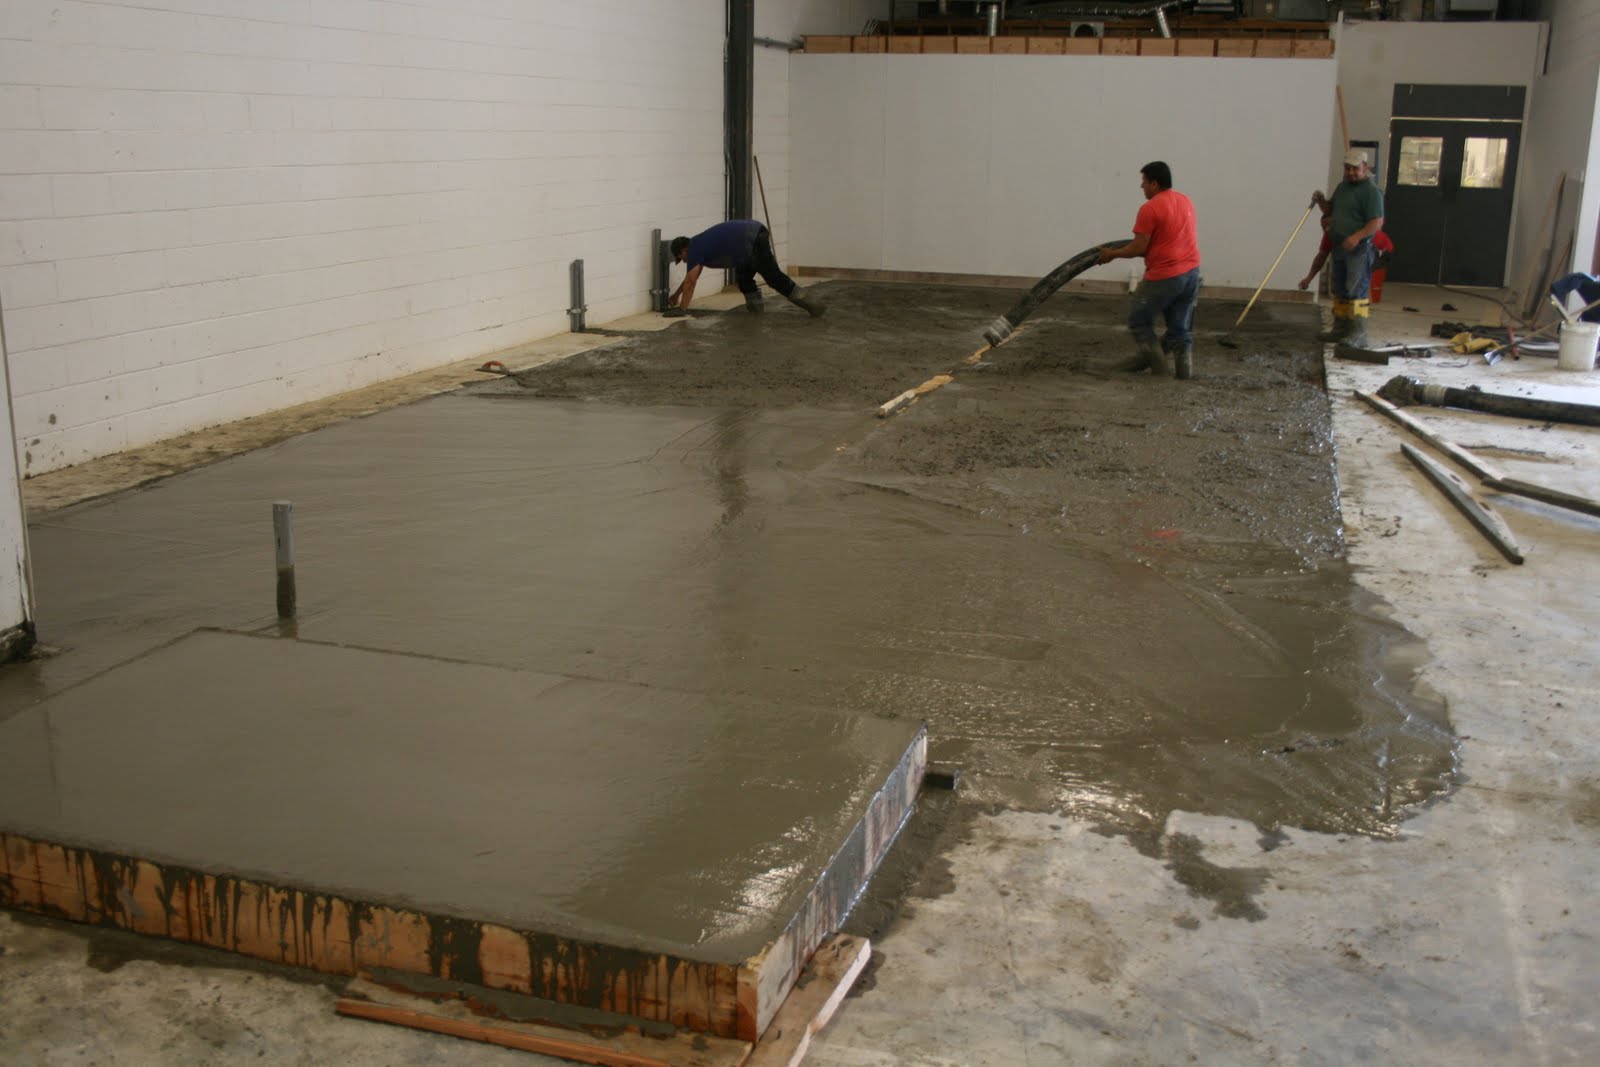
With the structural supports set and all inspections passed we were set to start pouring the new floor by 11:30 AM—of course the concrete truck was delayed and did get here until close to 3:00 pm.  On a side note, the owner of the concrete company quoted me the price based on some plans we emailed him but when he came by to review the site before starting the work he realized that a concrete pump was going to be needed to move the concrete from the trucks, through our loading area and on to the area where the new floor was being poured.  It changed the price but it wasn’t really a big deal.  Since we are so knowledgeable about all things construction we assumed it was some kind of small pump to move concrete.  In reality the concrete pump is a truck is the size of a fire engine with a gigantic arm that can move concrete hundreds of feet.  Not really what we expected.   


Once concrete trucks arrived the team started pouring and working the concrete to get the correct slope on all four sides.  It took about five hours of screeding and troweling to get the concrete to set up in the proper slope.  


After that the owner stayed behind to continue to go over the floor with a power trowel every few hours as it cured.  Once it was fully set he needed to score the new the new floor in three places.  The reason they cut the floor is that as the concrete cures it will shrink which causes cracks.  With the cuts in place any cracks that might happen will hopefully form against the cuts and protect the floor.  We took off around 11:00 pm and from what he said the next day, he was here until around 3:00 am by the time the floor had cured enough to make the cuts.  


Sunday, May 1, 2011

Floor Prep

After having to unexpectedly dig up most of the sand where the concrete floor use to be to repair the electrical that was destroyed by the demolition team, we needed to back fill the holes now that the plumbing and electrical had passed inspection.  We were told that since most of the sand had been disturbed we would need to wet it and tamp it down with a mechanical compressor so we would have a solid base for the new pour. 

We also needed to excavate some of the sand in order to account for the slope on the new floor.  Since the drain was installed about two inches lower than the existing edge in order to create that slope we would need to remove a few inches of sand in order to get a full six inches of concrete on the new pour.  All this was supposed to be handled by the demolition team, but since that went so well the last time we decided to get a new crew to pour the concrete and since it was such short notice we did the prep work ourselves over the weekend.  It took about a day to remove the excess sand and then compact the base down but now the floor is ready for new concrete.

Wednesday, April 27, 2011

Plumbing Inspection


We had our first inspection today and of course we failed.  The plumber was here a few days ago to connect our trench drain to the existing sewer line.  Apparently he used the wrong size pipe.  Not a big problem but we were hoping to back fill the pipe and prepare the floor for the concrete pour that is happening later this week but that will have to wait for the plumber to come back and fix the problem and another inspection. 

On the plus side our electrical inspection passed.  The electrician finished running all the under slab conduit and now we can back fill the trenches and get ready to pour.  

Tuesday, April 12, 2011

Next Problem

Now that the floor has been removed we can’t really move ahead on anything else until the rest of our permits are issued.  It has been a few weeks since we got them the names of our contractors so I figured it was a good time to stop over and see where we stood.  We were told that the zoning officer had yet to sign off on the plans and he was leaving in a few days for vacation so we should speak to him if we wanted anything in the next two weeks.

We figured that getting his sign off wouldn’t be a problem.  Back before we signed the lease we spoke extensively with zoning to make sure there wasn’t going to be an issue or a repeat of Manasquan.  After the warm reception in Manasquan one of our top priorities when looking for a new place was that it did not require a zoning variance.  

After a few conversations, we determined that the building was zoned properly and we could move forward with our plan.  The zoning officer told us that they would be required to sign off on any plans for construction but that shouldn’t be a problem now that we cleared from a zoning perspective. 

So we got a hold of the zoning officer, expecting a quick sign-off ,when the first thing they told me after looking at the plans was that I could not put our glycol chiller outside the building where we had planned.  We were told that it appeared as thought a variance would be needed to put the chiller in the parking lot on the side of the building.  

The only way they would know if I needed a variance was if I submitted a site plan of the property including the proposed location of the chiller.  In order to submit a site plan I needed an updated survey of the property—which we didn’t have.  That meant hiring a surveyor and getting an engineer or architect to turn that survey into a site plan.  And that wasn’t the worst part.  We then needed to go before the board the get the variance approved—which would require hiring an attorney and planner to represent us.  Having lived through that process before, I realized that it could take months and cost thousands of dollars.

They claimed the issue was that the chiller would take up space along the side of the parking lot and may obstruct the flow of traffic.  My understanding is that according to code we need 12 feet on both side of the driveway in addition to any space the chiller may take up.  Without an accurate survey and plan they couldn’t tell if there was sufficient room for the unit.  

The best part of this discussion was that there is an existing air conditioning unit next to the proposed chiller location that takes up as much space in the driveway as our new unit would.  The air conditioner has been there since the building was completed in the 1980s without issue.  We were told who ever did that did it without proper permission so it was irrelevant to this matter.  

So now were back to the drawing board on the chiller and we need a solution before the zoning officer goes on vacation or we have to wait another two weeks for permits. 

Sunday, April 10, 2011

Floor Demolition: The Aftermath

Yesterday we had the concrete floor in our brewing area removed.  It took the 6 guys about 9 hours to break up six inches of concrete with wire mesh reinforcement.  During the demolition we realized that once they broke through the concrete they exposed electrical conduit that was laying on top of the sand under the floor.  We told the guys to watch out for the conduit because the electrical wires housed inside were still in use and we didn’t want to have to fix them if they got cut.  

When the demolition team left that night, it seemed like everything was fine.  Some of the plastic conduit had been crushed or broken but there didn’t seem to be any issues with any of the electricity in the building.  Luckily for us we just happen to have an electrician coming in the next day to do some work.  Once he saw the broken conduit he became concerned and took a look in our service panel to inspect for damage.  Of course he found some major problems.  


Between the Bobcats and jackhammers and not re-burying the conduit before continuing to work the demo guys cut through about five or six wires in each of three conduits running under our floor.  We didn’t realize it that night because the cut wires were powering equipment that was not currently in use, like exterior light, air conditioning units, etc.  


It took three days of unearthing existing conduit, digging new trenches and re-running wires and conduit to fix the problem.  The cost of the mistake ended up being just about as much as the floor demolition.  On top of that it also pushed back the work the electrician was here to do by another three days.  The one thing we’ve learned as construction has begun is that you need to watch everything that is being done all the time.


It seems that most contractors with large teams come in and set things up then take off to the next job.  In this case no one from the construction company was supervising the work and although we pointed the electrical issue to the workers they didn’t really care.  We’ll have to work something out with the construction company on the repair bill but it was another lesson learned.

On a bright side, as you may have noticed from the pictures we did get our trench drain set in place this morning before we discovered any of the electrical issues.


Thursday, April 7, 2011

Demolition Permits

The town’s construction department issued us our demolition permit today!  Finally we can start construction.  As excited as we are, while we were standing there getting the permit and talking to them about the process we realized that we plan to run some electrical conduit under the new concrete slab and that the trench drain needs to be connected to the city sewer line before the new floor can be poured.

The demolition permit only covers the removal of the concrete floor.  The permit(s) that cover the plumbing, electrical and pouring of the new floor are attached to the other application that has not yet been approved.  We split the demolition permit since that would move through the system faster alone, but now we realized that once the floor is ripped up, we can't really do anything else until all the other permits are issued.  It’s going to be nice to get the floor removed, but we are going to be at another stand still until the rest of the other permits are issued. 

So what’s holding up the other permits?  We still need to get them the names of the contractors doing the steam, glycol, plumbing and electrical.  We’re working on getting those contractors lined up.  We’ve had a quite a few contractors stop by the brewery to look at the scope of the work, but we are still waiting to get the estimates back.  Once we have those names to the town, it’s up to them how long it takes to process the paper work.

We also forgot to mention that I heard from the fire marshal.  We need to add some sprinkler heads to the walk in cooler and move some other existing heads to new locations.  Not as bad as I had thought it would be, but that could change during inspection.         

Tuesday, April 5, 2011

Concrete Floor

Since we submitted our plans to the town, we’ve been busy speaking with contractors and getting bids for the work.  Our priority is finding a mason to handle the concrete work since we will be getting those permits first and we need to take care of that before any of the other work can commence.  After speaking with a few masons it seems like we are going to be able to afford to demo the floor in our brewing area and pour a new floor sloped to the trench drain. 

The cost difference between just pulling up a section of the floor for our new drain and the entire floor was not as great as we had expected since most of the expense was in getting the equipment set-up and the workers on site.  Once that had been taken care of it was just a matter of a few more hours of work and some extra concrete. 

We’re pretty excited about the new floor because we were really concerned about standing water on the brewery floor, especially in the hot and humid summer, and any potential issues with sanitation.  We are hoping that the sloped floor will help keep the water from flowing all over the brewery and help keep the place more sanitary.   

The other advantage to pulling up the floor is that we will know exactly the strength of the new floor once it’s in place.  We took some core samples of our current floor to a few months ago to see if it would be strong enough to support out equipment if we decided to not rip it up.  From the two samples we drilled it seems like we have a six inch slab with some wire mesh added for strength.  Unfortunately, it looks like who ever poured the floors let the wire mesh settle to the bottom of the pour instead of suspending it in the slab so that reduces the strength of the floor. 

Even still, the engineers have told us that the floor in its current state will have no problem supporting our equipment, but since are going to go through the trouble of pouring a new floor, we plan to use a heavier gauge wire mesh and make sure that he floor is poured correctly and is at least 6 inches throughout.  This way if we ever need to put more weight on the floor it won’t be an issue.

In addition to the mason we have been talking to floor covering specialist about what to do with our new concrete floor.  Almost every mason and flooring expert we have spoken to says that an epoxy floor treatment is the way to go.  They claim that a serious epoxy treatment will stand up to the thermal shock and chemicals expose our environment produces.  Every brewer and brewery owner we have spoken to says that an epoxy floor coating will last about six months and be more trouble in the long run once it, inevitably, starts to chip and flake apart.  From what we’ve seen visiting breweries that have used epoxy flooring we tend to agree. 

Outside of using acid tile flooring, most brewers seem to say that a polyurethane flooring system hold ups the best in a brewing environment.  Typically these products are ¼ inch thick cementitious polyurethane systems (whatever that means), with high levels of temperature, chemical and slip resistance.  They are typically used in food and beverage, pharmaceutical and other manufacturing and process environments.  They are pretty expensive but if you can afford it, plan to be in the same place for awhile and believe they will perform as sold, then they seem to be worth the up front cost—especially if you are going through the trouble putting in  new flooring.

We spoke to representative and technical people from a few companies and the products all seem to be pretty similar.  I’m sure there are more companies out there, but the commercial names of the products or companies we looked into were Ucrete, FlowCrete, Sika, Stonhard, Dura-Flex, in case anyone is interested.  The other interesting about these products is that you can actually use this stuff to build up a slope on a flat floor.  So if our floor was strong enough to support our equipment and we didn’t want to pour a new one to get a slope, we could use these products to create a slope.  The technical guys claim that the floor will not crack until the weight of the tanks, like concrete poured on top of an existing concrete floor, but the cost was petty close to that of pouring new floor so we didn’t really see the advantage.  No decisions have been made yet but it seems likely that we will be using one of these products on our new floor.      

The last piece of the flooring puzzle was the trench drain.  We had the same concerns with the durability in a brewing environment that we had with the flooring.  Again, I’m sure there are many more companies and products that sell suitable drains, but we were deciding between using an ACO and an ABT drain.  Both had the same level of chemical and temperature resistance and one of the sales representative told us that they are basically the same drain, but he ACO one has a stainless steel rail on the top.  Since the lead time on the ABT drain was less and we needed it we went with that, but I’m sure either would have been fine.  We got about their PolyChampion trench drain system and FiberGlass grates.  Both the drain and the grates are made with a vinlyester resin that makes them more resistant to heat and chemicals then their other drain system.            

Now that we seem to have a pretty good idea what were are doing with the flooring in our brewing area we are just wanting for the demo permit to be issued so we can get started. 

Tuesday, March 29, 2011

Brewery Plans


First, we finally got a full set of plans from our engineers this week.  As soon as we received the plans we went down to the town to submit and discuss the permitting process again.  Luckily the town was willing to accept the drawings and the permit applications without the names of the contractors who will be doing the work.  

We decided to split the permits into two different applications.  All the demolition work we plan on doing to the floors is going to be in one application, and the rest of the work will be attached to another application.  The logic behind the split is that the demolition work does not require a lengthy review and it is the first work we need to get completed, so the construction official said they could get us those permits more quickly if it was separated from the total application—so we did.  

We were told to expect our demolition permits in a week or two and our full set of permits within two to six weeks.  Not the time line we were hoping for but there's nothing we can do about that.   

The way the engineers designed the brewery they gave us a few options so we could decide on how we wanted to proceed once we started getting some quotes in from contractors.  We would like to pull up the existing concrete floor in the entire brewing area and pour a new concrete floor that is sloped to a center trench drain.  However, if that is beyond our budget, at a minimum we would just cut out a center strip of concrete that would allow us to install a trench drain in the center and leave the floor mostly in tact.  If we go in that direction, we will probably install a curb around the brewing area to keep the water from flowing all over the brewery.


The photo above shows the layout of our brewing equipment.  It’s a bad photo and kind of small but we can try and describe what's going on.  This section of our warehouse is the outside wall of the building.  The top rectangle is actually outside the building and its where we intend to install our glycol chiller unit.  The two smaller squares on the left are our steam boiler that will heat our boil kettle and hot liquor tank.  In most breweries these units are somewhere out of sight, but since our gas, electrical and water supplies are located in the utility room partially show in the photo, that was the best place to install them.  The two vessels with what looks like stairs between them that are perpendicular to the wall are the brew house vessels.  The four tanks that are lined up against the back wall are the hot liquor tank and three ferementers, and our bright tank is at the end of the drain.  The small square unit next to the bright tank is our keg cleaning and filling equipment.  The room all the way to the right is our mill room where we will store, mill and auger our grain to the mash tun.  

The idea behind the design was to keep everything centered around the sloped floor and trench drain.  We wanted to be able to everything clean and keep water from running all over the brewery.  There are a few things we plan to change about the design, for example, right now the grist case is outside the mill room next to the fermenters.  We are planning to move that into the mill room to contain any potential grain dust and to keep it away from fermenting beer.  The keg cleaning and filling equipment will probably be moved into a separate packaging area in the future, but for right now there is room and its seems like a convenient place to put this equipment. 

I know the picture is small and the description is questionable, but it hopefully gives you an idea of how our brew house and cellar will be organized.     

Sunday, March 27, 2011

Plans & Permits

While we were waiting for our engineers to finish the plans for our brewery we went over to talk to the construction officials about the permitting process.  As you may recall we needed to get a more detailed set of plans from a licensed engineer for two reasons (1) in order to get permits to do the work and (2) so we could get accurate bid from contractors. 

Our engineers told us that the way the permitting process works is that you submit the plans to the town for review, then once the town approves them you can send the plans out for bid from local contractors.  Makes sense to me.  The logic there is that if you get bids before the town approves the plans and then they change the scope of the work will change which will most likely affect the cost. 

When we spoke to the town about this process they said you submit the applications for construction permits, including the names of all the contractors doing the work when you submit your plans.  Naturally we asked what would happen in the event of any changes the town required.  They lead us to believe that if a licensed engineer signed and sealed the plans and they were up to all NJ state codes there shouldn’t be any changes.   

The problem we had with this process was that once the engineers finish the plans we would then need to take a few weeks to get bids and line up the contractors.  Only then could we submit the plans to the town for review.  If we could have the town officials reviewing the plans while we were working on getting the contractors lined up that would have saved some time. 

We mentioned this to the construction officials and they said we could submit the plans with “to be determined” in the contractor section of the permit application if we wanted to get the process started sooner.  Hopefully that will move the process along, but we image not too much will happen until we get them the names of the people doing the work. 

The plans are supposed to be ready this week so we’ll see what happens once we get them.